
Docker Network and Linux Network Namespace
In Docker we can create a new network using docker network create with several options. In this post we will take a look at some Linux networking concepts that are used, the basic Docker networking concepts, and how we can use these to construct a custom container network.
Network Namespaces
Docker leverages Linux network namespaces for network isolation, like the way it uses other namespaces (e.g. process namespaces, user namespaces). A network namespace provides a shared set of network interfaces, routing table, and firewall rules. Each Docker container has its own network namespace.
A new network namespace can be created by the command:
sudo ip netns add <name>
For example, if we add a network namespace my_netns by sudo ip netns add my_netns, we can check and see this new namespace is created by running the following command:
sudo ip netns list | grep "my_netns"
ip netns list will list all network namespaces in /var/run/netns. This will output something like:
my_netns (id: 0)
Now that we have a new network namespace, we want to move a network interface under it so that we can direct traffic into or out of it. In our example we will move a network interface eth1 from the default network namespace to my_netns. This can be done using:
sudo ip link set eth1 netns my_netns
And we can then verify that eth1 is moved under my_netns with:
sudo ip netns exec my_netns ip link list | grep "eth1"
Command following ip netns exec <netns_name> will be executed under the specified network namespace, and when it’s not specified the default network namespace will be used. The command above will result in something like:
770: eth1: <BROADCAST,MULTICAST,UP,LOWER_UP> mtu 9001 qdisc mq state UP mode DEFAULT group default qlen 1000
Note that we need to use ip link set netns a bit differently when we want to move a link layer device back to the default network namespace. We can’t tell the name of the default network namespace, so we need to use the pid of the init process (which is 1) to specify this:
sudo ip link set eth1 netns 1
Bridge and Veth
To create a Docker network we need to first specify the network driver by --driver or -d, and the default value used is bridge. A bridge in Linux is a link layer device that forwards traffic between network segments, and in Docker this device is software-defined, or virtual. When Docker starts it creates a default bridge (docker0), and newly created containers will connect to it unless --network is specified. But typically we’ll want to create our custom bridges to have better isolation and finer configuration. The most common use case of bridge network is when we have applications running in standalone containers on the same Docker daemon host, and we want these applications to communicate.
After choosing the driver, we can then specify the subnet (--subnet) and gateway (--gateway) of the network created so that we can talk to it. Note that the subnet is purely for ip-addressing purpose and is not a subdivision of the network. Furthermore, we can use --opt to set driver-specific options. For example, we can set the name of the bridge using --opt "com.docker.network.bridge.name"="docker1".
Now that we have a bridge set up, we need to attach network interface to it (or, to put it in another way, to have a network interface “mastered” by it). Physical network interface (NIC) is not always handy, but fortunately we can use virtual interfaces (or veth). The veth devices are always created as a interconnected pair, and have a useful feature: packets transmitted on one device are immediately received on the other device. Therefore, by attaching one veth to the docker bridge and the other to a network namespace, we essentially enable the communication between all containers created using the bridge and the network namespace!
We can first create a pair of veths with the following command:
sudo ip link add veth_br type veth peer name veth_my_netns
And then make one veth mastered by the Docker bridge:
sudo ip link set veth_br master docker1
Now we need to put the other veth into the network namespace that we need to talk to. Say we want to communicate with my_netns that we just created, then we need to do:
sudo ip link set veth_my_netns netns my_netns
Turn on both virtual interfaces:
sudo ip link set veth_br up

sudo ip link set veth_my_netns up
Last but not least, attach protocol address to the veth on the my_netns side:
sudo ip netns exec my_netns ip address add 123.456.0.0/16 dev veth_my_netns
Now traffic from CIDR 123.456.0.0/16 in my_netns namespace can be received by docker1 bridge and further forwarded to containers. The diagram below illustrate the result after we’ve gone through these steps.

Iptables
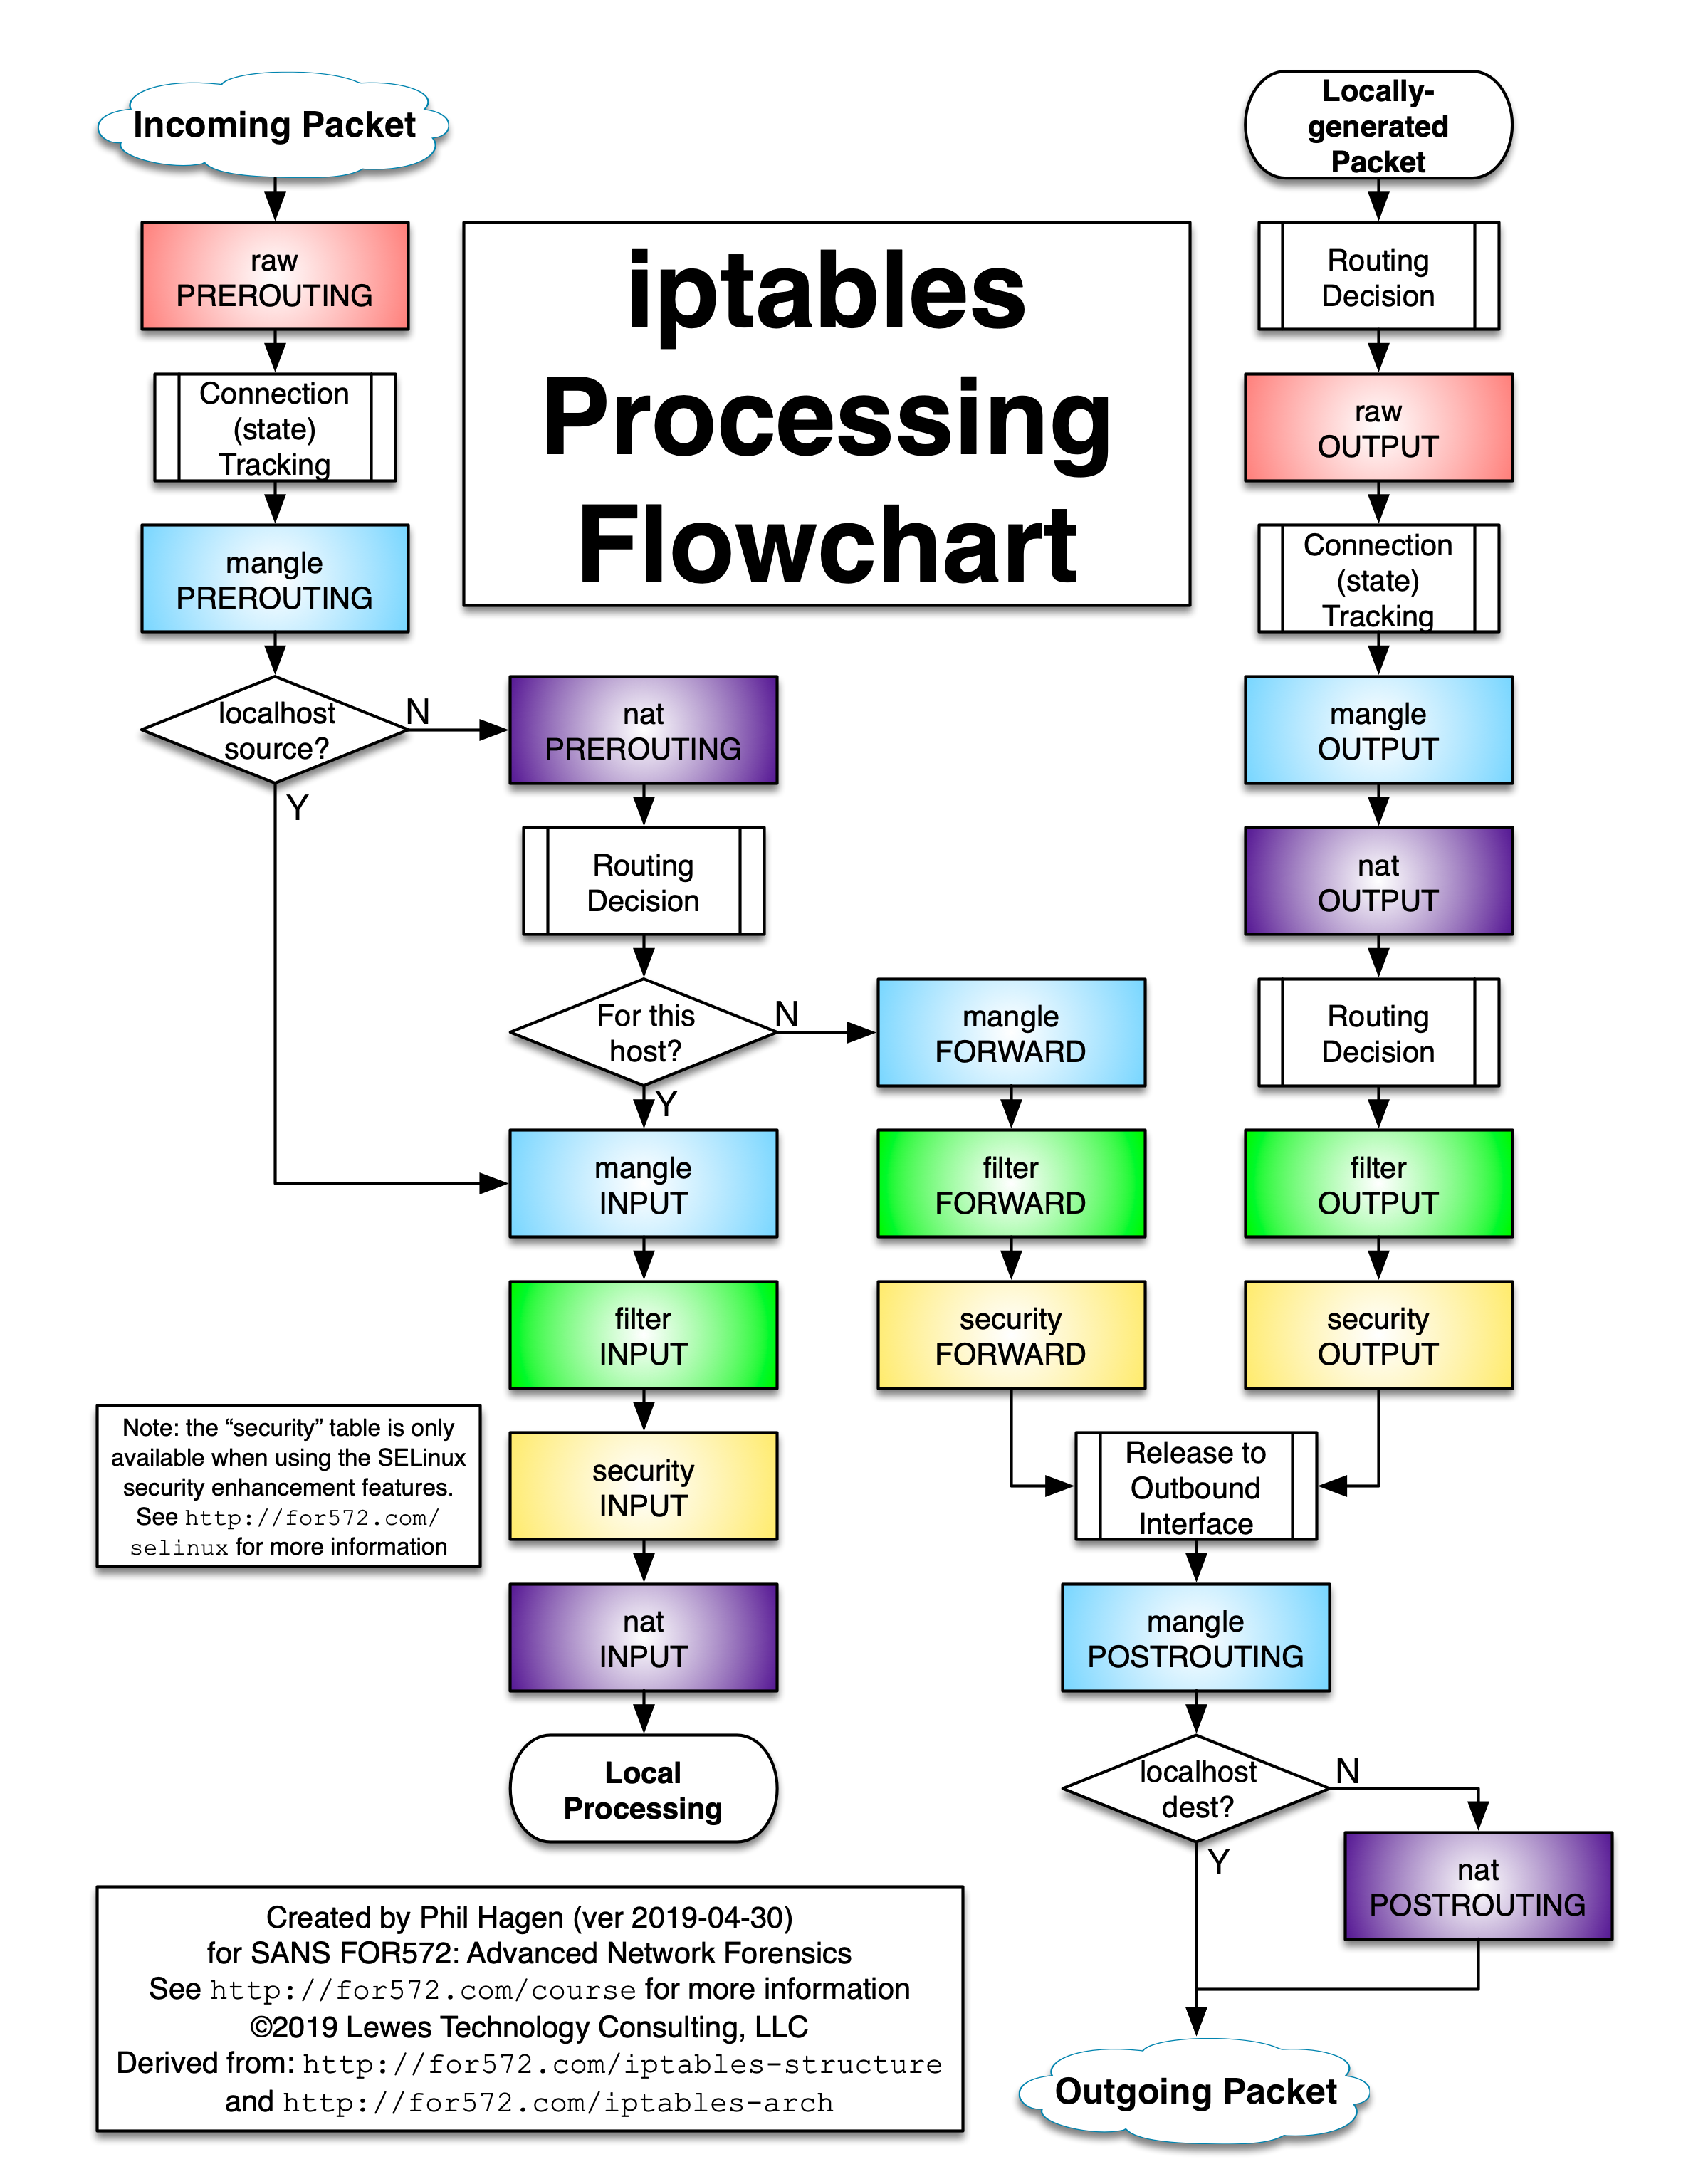
Linux iptables manages fire wall rules through a complex control flow chart (as demonstrated here). When Docker engine starts it manipulates the iptable to add two extra chains: DOCKER and DOCKER-USER. It also makes sure that these two chains are checked before other chains. If we want our own rules added for Docker, we need to put them into DOCKER-USER chains. These rules will be loaded before DOCKER chain.
In previous sections we’ve created a network namespace and connect containers to it via the use of bridge and veth. Now if we want to allow certain external traffic to arrive at our containers, we can use iptables command to add specific policies. For example, if we want to allow the subnet 10.0.0.0/16 to send request to port 1234 to a container with ip address 111.222.33.4, but we don’t want to expose this port directly, we can add a PREROUTING rule to the nat table in my_netns namespace:
sudo ip netns exec cns iptables -t nat -A PREROUTING -p tcp -s 10.0.0.0/16 --dport 1234 -j DNAT --to-destination 111.222.33.4:1234
This way, the request from 10.0.0.0/16 will be forwarded to the desired container port if it’s sent to the public address of eth1 network interface of my_netns.
Conclusion
With examples from previous sections, we are already able to construct a simple custom container network! I’ll try to dive deeper into other Docker network drivers and more advanced setup later.